Vibe Coded Portfolio
Building a portfolio by prompting
Role
Product Designer
Timeframe
Ongoing
Tools
Lovable, ChatGPT, Claude Code, Figma
Tasks Performed
0→1 Design, UI/UX Design, Interaction Design, Prompt Engineering
Overview
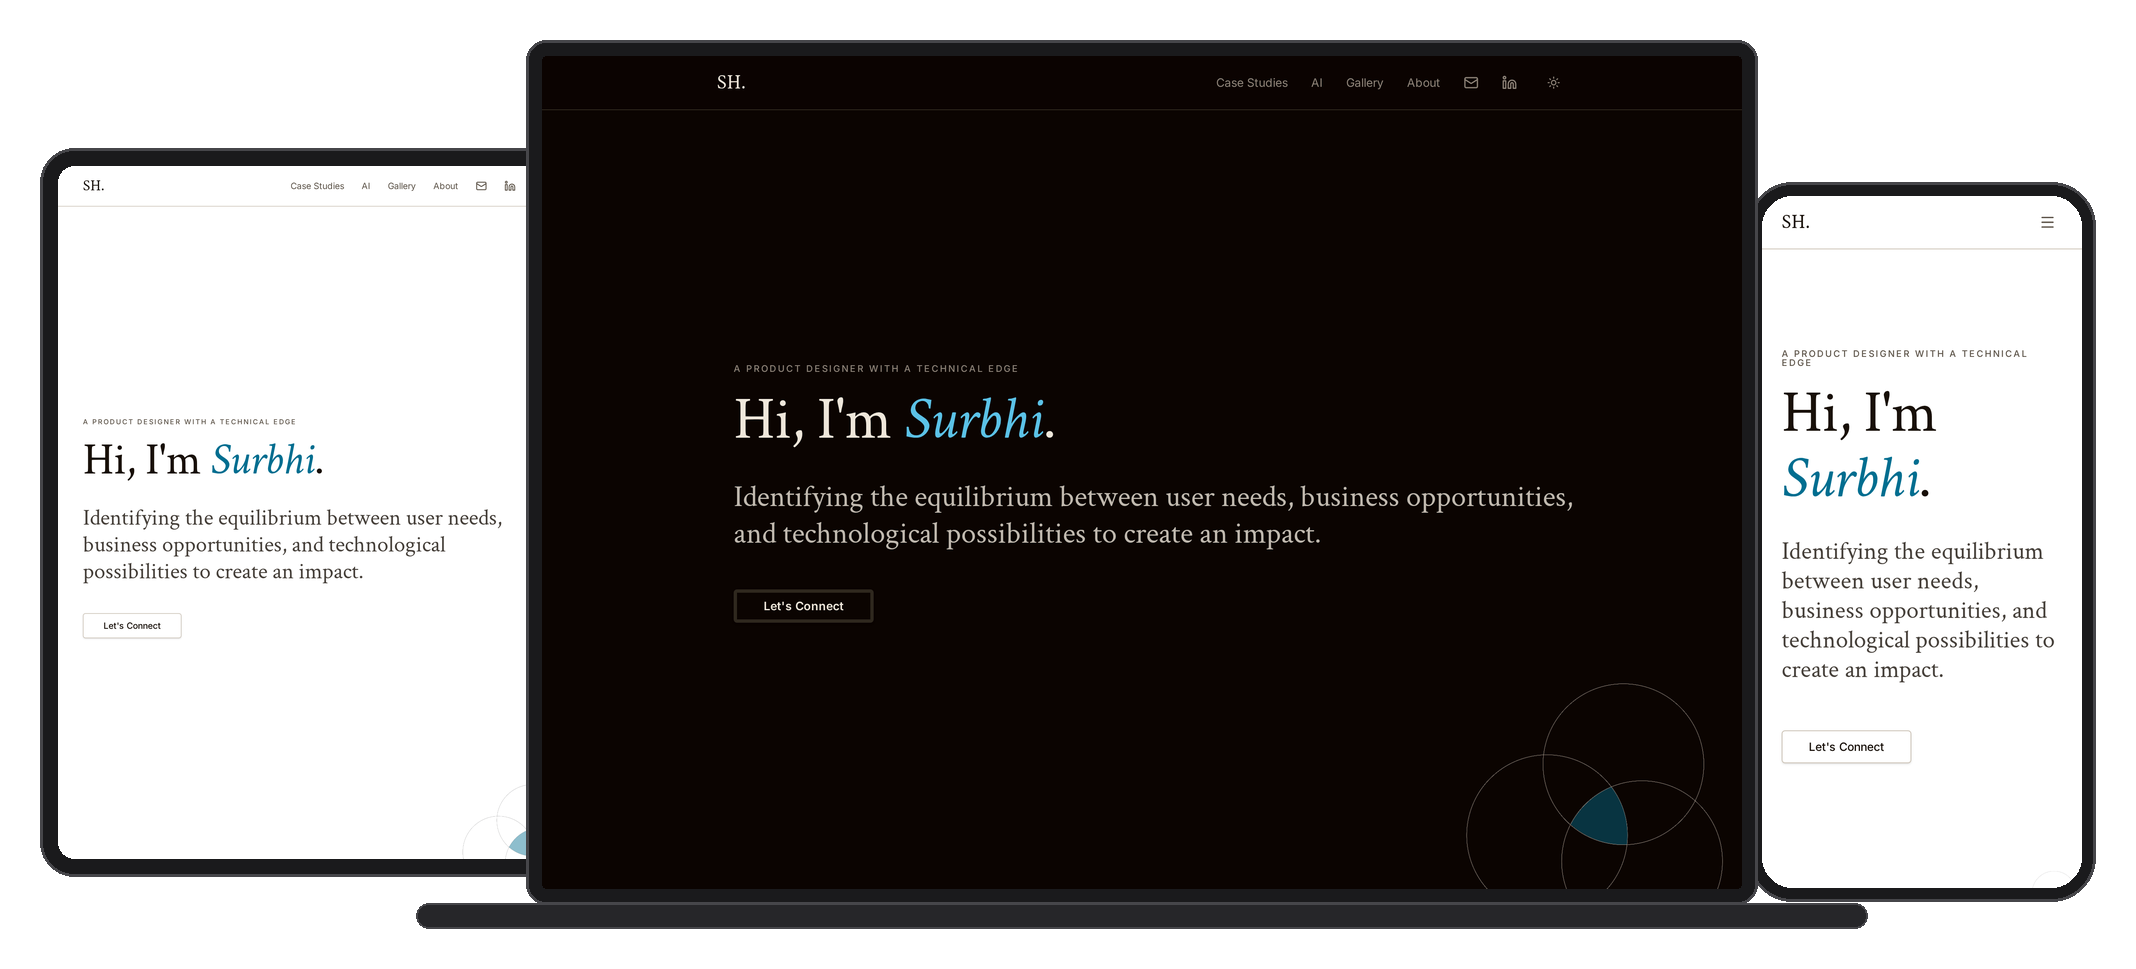
- Goal. Ship a live portfolio that looks and feels custom-built, without hand-coding it from scratch or hiring a developer, and use it to show I can bring AI into the design process and vibe code the result myself.
- Process. I designed the whole thing first, then used Lovable to build it. I treated the AI the way I'd treat a fast junior developer: a clear brief, a design system to follow, and finished content to place, so it spent its time assembling instead of guessing. Where I wanted tighter control, I moved into Claude Code and Cursor.
- Impact. A responsive, accessible portfolio live at surbhihote.com, built inside a single month of Lovable's Pro plan by keeping credit use tight, using a workflow that scales down to the free plan for anyone on a smaller budget.
Design
Do the design work before you open Lovable
The biggest credit saver isn't a Lovable trick. It's finishing the thinking before the AI starts building. Every vague prompt turns into two or three follow-ups, and on Lovable every follow-up costs credits. So I did the slow part offline.
Before I touched the builder, I had
- A sitemap and page structure. Home, work, individual case studies, about, contact. I knew what lived on each page and in what order.
- Final copy. Every heading, case study intro, and button label written and edited in a doc first. The AI is not a copywriter you want to pay by the message, so I pasted finished words in.
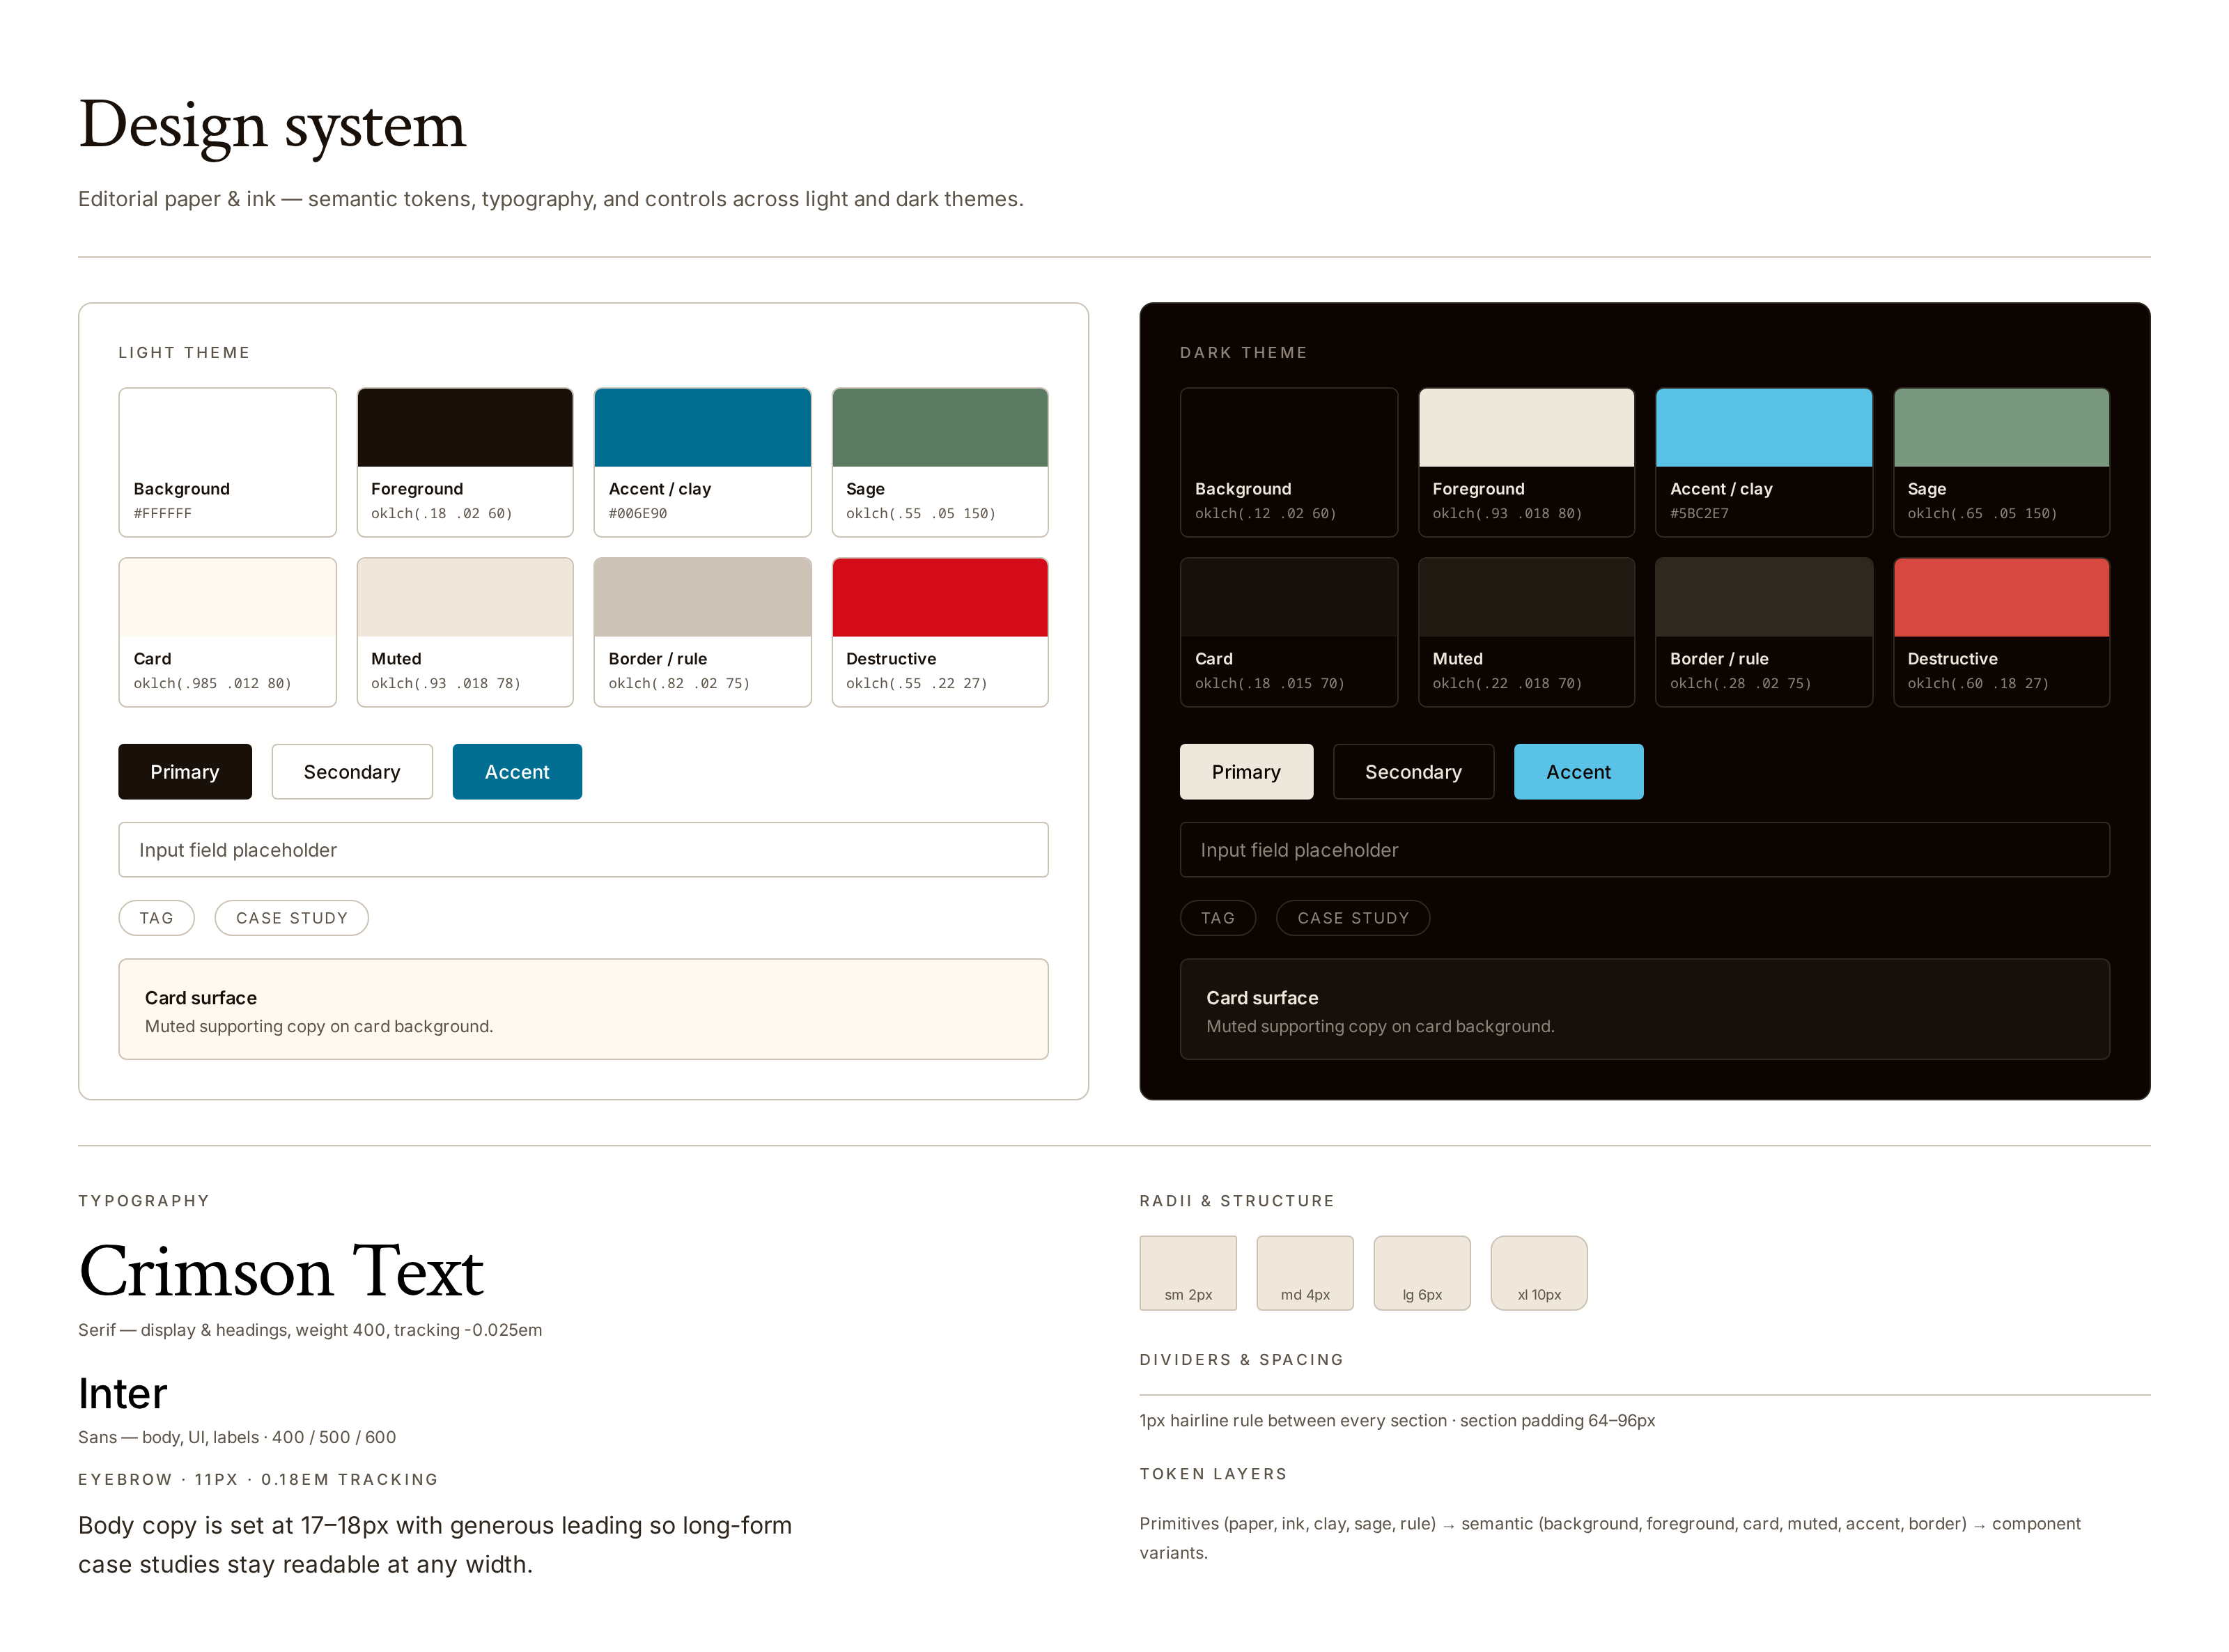
- A design system. Colors as hex values, a type scale, spacing, radius, and one or two accent colors, defined as tokens. That way I could tell Lovable exactly what to use instead of letting it invent a palette I'd have to correct later.
- Reference. A couple of sites whose layout and feeling I wanted to borrow from, plus my own rough wireframes.
If you use a free chat tool like Claude to pressure-test your structure and write your copy first, that planning costs nothing. You walk into Lovable with a finished plan and spend credits on the build, not the brainstorm.
Build
Building the portfolio on Lovable, step by step
Open with one strong prompt, not ten small ones. My first prompt described the whole site in a single pass: the vibe, the audience, the structure, the accent colors, light and dark mode, and the tone. A specific opening prompt gets you most of the way there in one build instead of a dozen. A version of what I used:
Build a portfolio site for a senior product designer. Audience: recruiters and hiring managers at design-led and AI-first teams. Aesthetic: minimal, modern, confident, with one or two accent colors and subtle motion. Light and dark mode for accessibility. Pages: home, work index, individual case studies, about, contact. Case studies should read as clear problem-to-solution narratives. Use my design tokens for all colors, type, spacing, and radius.
- Lock in your design tokens early. Once the shell existed, I had Lovable set the tokens in three layers: primitive values (the raw colors and sizes), semantic tokens (background, surface, primary, muted), and component-level tokens. Getting this in place first means later changes are one edit to a token instead of a hunt across every page.
- Build page by page, not all at once. I finished one page before moving to the next. Small changes are easier to check, and it keeps the AI from touching things you already got right.
- Edit in the preview instead of prompting. For copy fixes, spacing nudges, and color swaps, I edited directly in the preview. That's where most of the saving happens.
- Move to Claude Code or Cursor for the fiddly parts. When I wanted precise control over an animation, or a layout the builder kept fighting me on, I worked in code instead. A common pattern now is to prototype most of a project in Lovable, then finish in Cursor or Claude Code. That's not a failure of the tool, it's just using each one for what it does best.
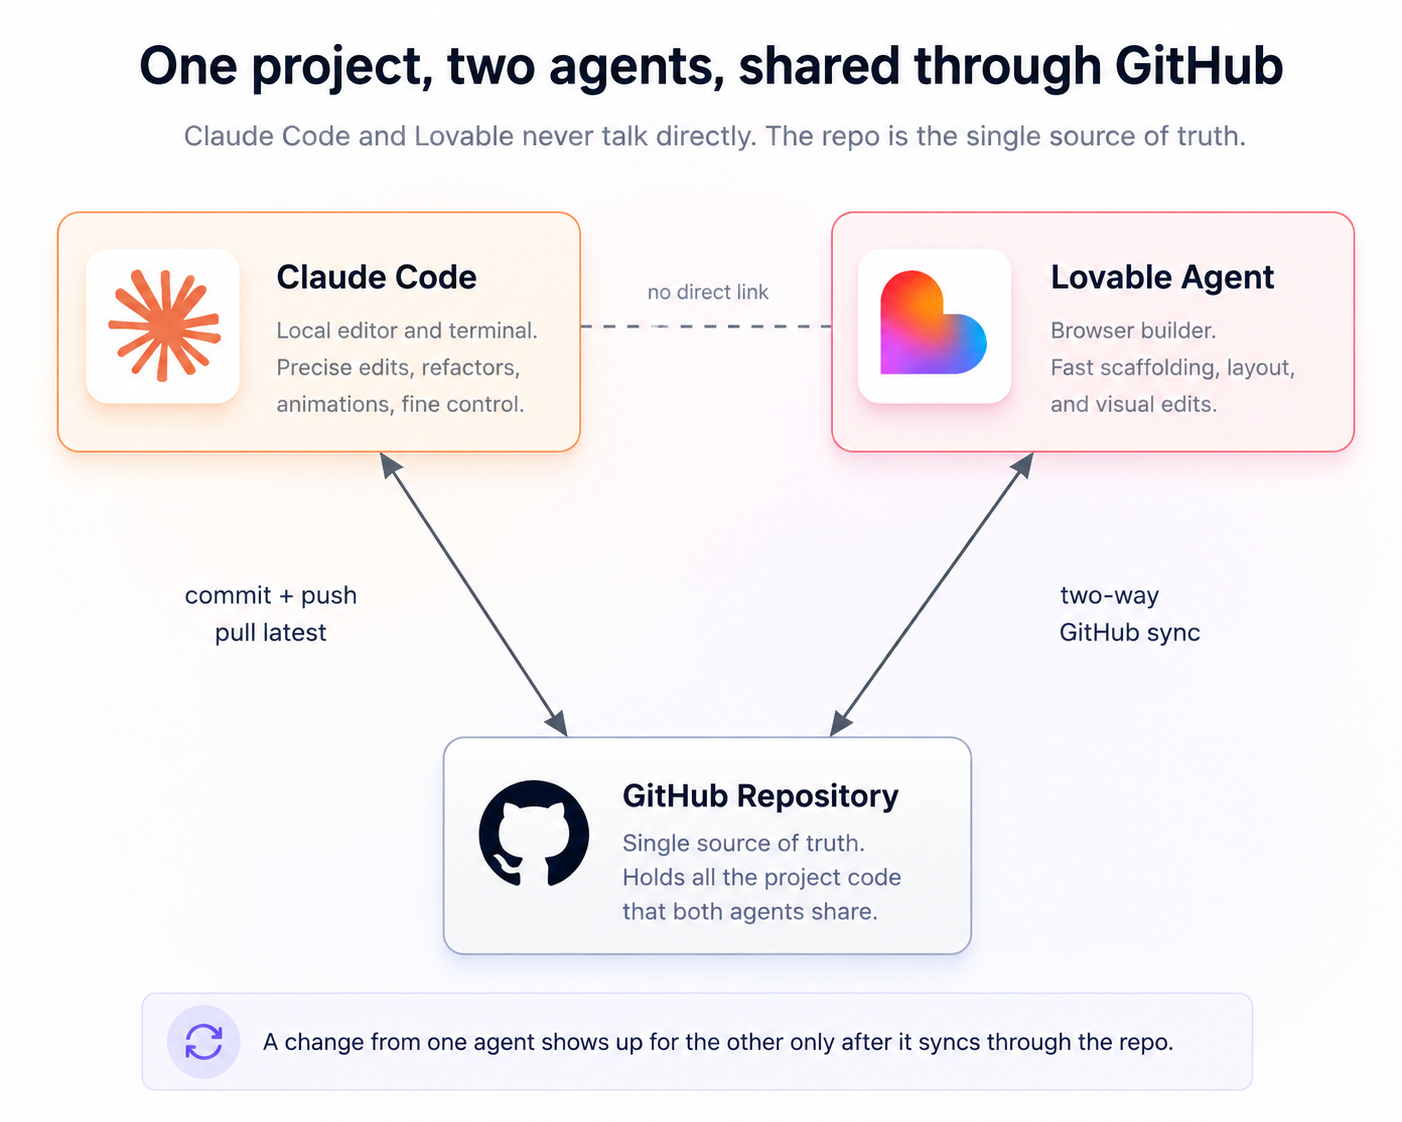
Running two tools on one site is simpler than it sounds, because they don't have to talk to each other. Lovable and Claude Code both connect to the same GitHub repository. Lovable syncs to the repo automatically in both directions, and Claude Code pushes and pulls to the same place. The repo is the single source of truth, so a change I make in one tool shows up in the other after a sync.
Credits
Making your Lovable credits last on a budget
This is where most people overspend, so here's how the credits actually work and how I stretched them.
I built on the Pro plan, which starts at $25 a month with a monthly pool of credits that roll over, so my goal was simple: finish inside one month's credits and never touch a top-up. That's very doable for a portfolio, which isn't a complex app. If you're on a tighter budget, the free plan gives you 5 build credits a day, capped at 30 a month, resetting daily instead of rolling over, which is enough to finish a portfolio slowly if you're disciplined. (Verify the current numbers on Lovable's pricing page before you plan, since they change these.)
What costs credits
- A build or edit in default mode is priced by complexity. The initial structure is the single most expensive step. A small style tweak is a fraction of a credit.
- Every message in chat mode costs a credit, even when it changes nothing on the page. Brainstorming inside Lovable quietly burns credits. Brainstorm in a free chat tool instead.
What's cheap or free
- Inline text edits in the preview are free, up to a daily limit. For a portfolio, which is mostly text, this is the biggest saver by far. Fix headings and body copy by clicking and typing, not by prompting.
- Reverting to an earlier version is free. If a build goes sideways, roll back instead of prompting your way out of it, which costs more and often makes it worse.
How I stayed inside a single month of credits
- Batch every change into one prompt. Instead of "add a button," then "make it blue," then "round the corners," I wrote "add a primary button in brand blue with rounded corners, linking to my contact page." One credit instead of three.
- Be specific enough that there's nothing to guess. Exact copy, exact hex, exact spacing. Guessing is what causes the back-and-forth that drains credits.
- Debug outside Lovable. When something broke, I checked the browser console and dev tools first. Fixing an error you already understand is one clean prompt, not several rounds of "still broken."
- Spread the build across the month. Pro credits roll over, so there's no rush, and pacing the work meant I never came close to running out. On the free plan the 5 daily credits reset each day, so the same patience gets a portfolio done for nothing. Students often get a discount on Pro either way.
- Treat top-ups as a last resort. Extra credit packs cost more per credit than plan credits. If you're buying them regularly, upgrading the plan is cheaper.
Performance
Images and performance for a fast portfolio
Images are where a portfolio gets slow, and where credits get wasted if you let the AI handle them.
- Prepare images yourself. Export them at the size they'll actually display, compress them, and hand them over ready to place. Don't spend credits asking the AI to generate or fix imagery you can prep in seconds in your own tools.
- Use modern formats. webp for images and webm for video give you much smaller files than png, jpg, or mp4, with no visible loss. Smaller files mean a faster site and a stronger first impression.
- Right-size before upload. A 4000px hero on a section that renders at 1200px is wasted weight. Resize first.
- Lazy-load anything below the fold. Images and embeds that aren't on screen at load should load only when scrolled to. Ask for loading="lazy" on them.
- Name your files and write alt text. Descriptive file names and alt text help accessibility and image SEO, and they cost you nothing.
- Mind the badge and the domain. On the free plan you can't remove the "Edit with Lovable" badge or connect a custom domain. Getting surbhihote.com instead of a lovable.app subdomain, plus a clean footer, was the main reason I went Pro.
Friction
Where Lovable fought me, and how I handled it
Lovable is fast, but it isn't obedient. Being honest about that is part of using it well, so here's what to expect.
- It doesn't always follow instructions. You'll ask for one specific change and get a looser interpretation, or watch it quietly ignore a constraint you set clearly. Restating the instruction more narrowly usually fixes it, but that's another credit spent.
- It makes changes you didn't ask for. While fixing one component, it sometimes restyles another or "improves" a section you'd already finished. Then you spend credits putting it back, which is the most frustrating way to burn them.
- Undoing its mistakes costs you twice. Because dropped instructions and unrequested changes both take credits to reverse, a bad build can cost you once to make and again to unmake.
How I kept that from getting expensive
- Commit a version whenever a page is right, and roll back to it the moment a build goes off the rails instead of prompting your way back. Reverting is free, re-prompting isn't.
- Keep prompts narrow and scoped to one area, so there's less surface for it to wander into.
- Check the diff before you accept a build, so an unrequested change gets caught before it compounds.
- Move the precise work to Claude Code or Cursor. The things Lovable is worst at, exact layout and controlled edits, are exactly what a code editor handles cleanly.
- Keep your content and tokens in your own files, so if a build corrupts something you can restore it fast instead of rebuilding from memory.
The honest takeaway: Lovable gets a real site standing up remarkably fast, but it needs supervision. Budget for the occasional cleanup, protect your good versions, and it stays cheap and worth it.
SEO and GEO
For search, the basics still carry most of the weight
Building the site is only half the job. If a recruiter or an AI assistant can't find it, it may as well not exist. So I treated discoverability as part of the design, for two audiences: search engines (SEO) and AI answer engines like ChatGPT, Claude, and Perplexity (GEO, short for generative engine optimization). They overlap, but they reward slightly different things.
- A clear, keyword-aware title and description on every page, written for a person first and a crawler second.
- Real heading structure, one h1 and honest h2s, so the page reads as an outline instead of a wall of styled divs.
- Descriptive file names and alt text on every image.
- A sitemap and a robots file, so crawlers know what exists and can reach it.
For GEO, the goal is to be readable and quotable by AI tools
- I put my core claim in plain language near the top of each page, since that's the line answer engines tend to lift. On this case study it's the "In short" summary.
- I added structured data (schema markup) that tells machines who wrote the page, what it is, and answers common questions directly. A properly marked-up FAQ gives AI tools clean question-and-answer pairs to pull from.
- I added an llms.txt file at the site root: a short plain-text map of who I am and which pages matter, written specifically for AI crawlers.
There's one trap specific to building on Lovable, and it's worth knowing. A Lovable site is a JavaScript-heavy single-page app, so a lot of the content only appears after the page's scripts run. Search crawlers and AI bots read JavaScript unevenly, and text that isn't in the initial HTML can be missed entirely. All the keyword work in the world doesn't help if the crawler never sees the words. The fix is to make your content pages render their text as real HTML up front, through static or server-side rendering, not only on the client. It's the least glamorous part of the whole build and the one most likely to decide whether any of it gets found.
If you're a designer reading this, that's the real takeaway: SEO and GEO aren't a marketing task you bolt on after launch. They're structure and clarity, which is design work. Decide what you want to be found for, say it plainly near the top, mark it up so machines can read it, and make sure it's actually in the HTML.
Tips
General tips for designers who want to use AI and vibe code
- Direct the AI, don't hope at it. The designers who get good results write briefs, not wishes. Give it the constraint, the token, the exact outcome. It behaves like a fast junior who does exactly what you say, which is a gift when what you say is precise.
- Your design system is your leverage. Tokens are the difference between "change the blue everywhere" being one edit or fifty. Set them up first, and every later change stays cheap and consistent.
- Build accessibility in from the first prompt. Light and dark mode, color contrast, focus states, semantic structure. Retrofitting these later costs more time and more credits.
- Keep your content in your own files. Copy, image lists, and structure should live in a doc you control, not only inside one tool. If you rebuild or switch platforms, your content comes with you.
- Learn where each tool ends. Lovable is fast for standing up a real site. Cursor and Claude Code give you fine control. Claude Design helps you explore the look. Knowing which to reach for, and when to switch, is the actual skill.
- Show the work. Building your portfolio with these tools and then writing up how you did it is itself proof to an AI-first team that you can design and ship with them. Screenshot your prompts, your token setup, and your before-and-afters. That's the case study.
FAQ
Can a product designer build a portfolio without a developer?
Yes. I designed and shipped my whole portfolio myself by vibe coding it on Lovable, then refining in Claude Code and Cursor. The design thinking stays yours. The AI handles the code you'd otherwise hand off.
What is vibe coding, and can designers do it?
Vibe coding means building software by describing what you want to an AI agent in plain language and steering it, rather than writing every line yourself. Designers are well suited to it, because the job is really about giving clear direction and judging the result, which is what design work already is.
Which AI tools can designers use to design and vibe code?
I used Lovable to build and host the site, Claude Design to explore the look, and Claude Code and Cursor for precise control over layout and animation. They share one project through a GitHub repository, so I can move between them without losing work.
How much does it cost to vibe code a portfolio on Lovable?
I built mine inside a single month of Lovable's Pro plan, around $25, by keeping credit use tight. On the free plan you can finish one for nothing if you're patient, since credits reset daily. Verify Lovable's current pricing before you plan, since it changes.
What are the downsides of using Lovable?
It's fast but not always obedient. It sometimes ignores an instruction or makes changes you didn't ask for, and undoing those costs credits. Committing good versions, reverting instead of re-prompting, and moving precise work to Claude Code or Cursor keeps that under control.
What does "using AI in the design process" actually mean for a designer?
For me it means using AI to move from idea to a live, working product: exploring direction, writing and testing structure, and building the real thing, while I own the strategy, the design system, and the final judgment. This case study is a working example of that end to end.